 | The site before we started | One of the changes for 2009 is a new location for the vegetable plot. As you may recall, I started growing vegetables last year in a new plot I created, which then got expanded over the year. |
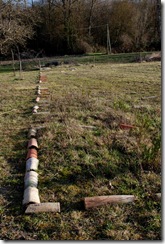 | The first line of tiles defining the edge of the plot | The site I chose turned out to be less than ideal, being shaded for much of the time by trees, and even some of the deciduous trees, like the cherry and walnuts offered a lot of shade even in winter. So, this spring I am intending to plant into a completely new plot and preparations have begun. After a lot of discussion, I have decided to create beds which are about 7m x 1200mm. I have found that 1200mm is a really good width for a bed as it is easy to reach the centre from either side making everything in the bed easily accessible. |
 | Quickly aligning tiles | I'm also now tending to start to think in terms of 1200mm squares for planting individual crops, so again, 1200mm wide beds are ideal. In last year's garden I grew 1200mm squares of garlic, spring onions, leeks, broad beans, peas, red cabbage and strawberries, so this was the starting point for my thoughts about the new plot. |
 | Minimising the errors | I'm fortunate in that I have a sizable piece of land, not far from the house which is not shaded by any trees, and this where I have decided to locate the new plot. The piece is far bigger than I will ever manage as a vegetable garden but I have decided to create an extensive design and then bring into operation beds as and when I need them and am able to. I still need to do some soil testing but at first look it appears that a lot of amendment will be needed as much of the land seems to consist of a fairly heavy clay. |
 | The first bed laid out | Having decided to go with this project, the first thing I did was to decide on a size of plot that will last me for several years. As I said, the overall plot is bigger than I will manage this year but by knowing the eventual size, I can hopefully avoid having to move things too much in future years. Once that was decided I started to break iup the plot into individual beds and quickly came up with 7m x 1200mm beds as ideal. |
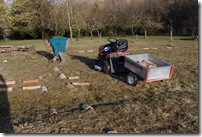
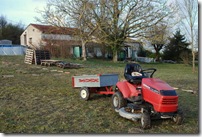
 | A quadrant bed | There is a path around every bed, 650mm wide, enough for a wheel barrow to be put down. I have also threaded some paths which are 1500mm wide so that I can get my little tractor and trailer in to garden if I need to move big or bulky items. In the layout of the beds we considered such things as sunlight, prevailing winds, slope and frost, and proximity to things like water and compost. |
 | At the cross roads | Once I had a drawing of the bed layout and was happy that I had used the space to best advantage and also produced a versatile design that will stand for many years, I started to set out the bed on the ground. The size of the bed turned out to be about 1/3 of the piece of land I referred to earlier and I chose to divide the piece in to 3 and use the centre section. I then cut the grass in this area, keeping the cuttings for use in the soil amendment. |
 | The helping hand of machinery | Next came the marking out of the piece and the beds. We gave quite a bit of thought to our planting for 2009 at this point and decided to make the beds which were going to be planted and leave the rest fallow until such time as we were ready to progress further. |
 | UH OHH!!! | I have a load of old roofing tiles and these were pressed into service as markers for all the beds and paths. During all this planning, I also visited the local garden centre who, of course, had wonderful offers on both potatoes and asparagus, which were too good to be ignored, so these two items came home with us, defining the first two beds to be prepared. |
 | The end of the day. | In the end, the layout gives three beds in a row with 4 rows between the main tractor routes, and I decided to opt for preparing a half of this space with just 2 rows of 3 beds. We also decided that we would include a circular seating area and a quadrant shaped bed in each corner. Laying the tiles was surprisingly time consuming but in the end we had all six beds and the seating area nicely defined in beautiful old Mediterranean Roman Canal tiles, as well as the outside edges and all four quadrants. |


1 comment:
Looks great!
Post a Comment